
Sharp Japanese kitchen knives make cooking work feel almost effortless. To keep your knives in top shape, you probably reach for a whetstone. Whetstones are brilliant, but they don't last forever in perfect condition. Every pass of a blade across the surface quietly wears away a little rock. Gradually, the middle sags while the edges stay raised. That uneven shape makes getting a clean, consistent edge on your knives basically impossible. To fix this, you need to know how to use a flattening stone. In this blog, you will get to know the whole process, step by step, so your sharpening gear stays in peak condition.
What Is a Flattening Stone?
A flattening stone is a block of very hard, coarse material designed to level out a worn whetstone. Some people also call it a lapping plate. Either way, these tools are significantly harder and coarser than your regular sharpening blocks. Many flattening blocks have deep grooves cut right into the surface. These channels push ground material out of the way as you work.
When you drag a flattening block across a dished sharpening surface, it shaves down those raised outer edges. Everything comes down to the same level. You can go for the Kazoku Prestige Flattening Stone. It is a high-quality 100-grit flattening stone made in Japan.
How to Use a Knife Flattening Stone Correctly?
Flattening your sharpening gear using a knife flattening stone takes patience and decent technique. Work through each stage carefully, and you'll restore your gear properly.
Prepare the Flattening Stone and Whetstone
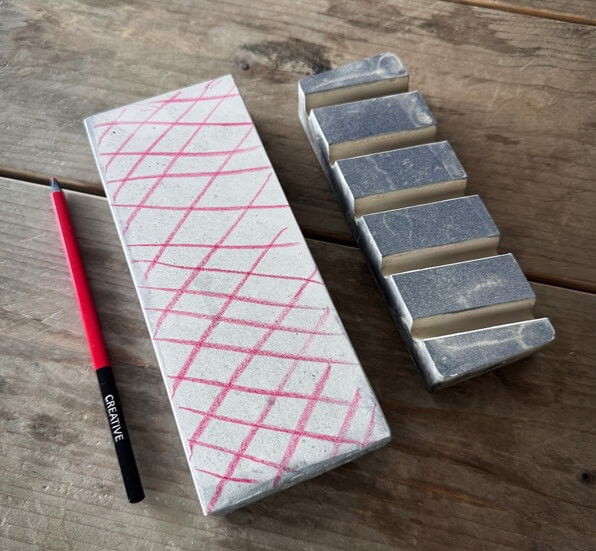
Gather everything and find yourself a clear workspace. Look over both the flattening stone and whetstone for cracks or serious damage before you start. Make sure there's enough room to move your hands freely without bumping anything, and also some fresh water.
Mark the Whetstone Surface with a Pencil Grid
Grab a regular pencil and draw a grid directly onto the dry surface of your whetstone. This grid is your progress tracker. As you grind, the pencil marks vanish from the high spots first. Wherever lines stubbornly remain, that's exactly where your low spots are hiding.
Wet the Stones Properly
Sharpening tools almost always need water to function well. Soak your whetstone according to the manufacturer's instructions, because some need a full fifteen-minute bath while others just a quick splash. Wet the flattening stone too if it is a ceramic one. Water cuts friction and produces a slurry that carries loose particles away from the surface.
Rub the Flattening Stone Evenly Across the Surface
Grip the flattening stone firmly and set it flat against the sharpening surface. Work it back and forth in long, smooth strokes covering the full length below. Press down with moderate, consistent force. Also, make sure you don't tilt the block.
Rinse Away Slurry and Debris
Keep working until every last pencil line has completely disappeared. A thick grey paste builds up on both surfaces as you work. Rinse both pieces in clean water to clear this paste away. Letting it accumulate actually slows the grinding down since the debris cushions the surface and stops the grit from cutting properly.
Verify the Whetstone Is Flat
Once all pencil marks are gone, lay a metal ruler or straight edge across the surface and crouch down to check the contact line under good light. Any light sneaking through beneath the ruler means the surface still isn't perfectly level. Keep grinding until that straight edge sits completely flush.
Clean and Store the Stones Properly
Rinse both blocks thoroughly under running water until all grit is gone. Wipe them down with a clean, dry towel. Let everything air dry fully in a well-ventilated spot before storing. Putting damp stones into a closed drawer invites mold and can actually break down the structural bond of the material over time.
Common Mistakes to Avoid When Using a Flattening Stone
Japanese kitchen cutlery, like Kazoku Uteki Rosewood Santoku, and all the tools to maintain it require a good amount of care. So, you need to make sure that you do not commit these mistakes when using a flattening stone.
- Skipping the pencil grid: Without this visual guide, you're essentially making your task much harder. You'll probably stop too early and leave low spots that quietly ruin your next sharpening session.
- Applying uneven pressure: Leaning harder on one side tilts the tool and creates sloped edges, so ensure you are not applying an uneven amount of pressure.
- Dry grinding the surface: No water means deep scratches and serious heat from friction. This can permanently crack a good whetstone and destroy its texture entirely.
- Neglecting to Rinse Slurry: That muddy paste building up isn't harmless. It acts like a cushion and prevents the coarse grit from cutting into the surface the way it should.
- Storing stones while wet: Damp gear sealed inside airtight spaces traps moisture perfectly. Over time, that trapped water weakens the material bond and creates ideal conditions for mold.
Conclusion
Caring for your sharpening gear matters just as much as caring for your Japanese kitchen knives. Knowing how to use a knife flattening stone keeps your whetstones level and genuinely ready to perform. Regular upkeep stops that gradual dishing that slowly ruins knife edges over time. With a flat surface and solid technique, your kitchen knives will stay sharp for everything you throw at them. Flatten your sharpening gear every few uses, and the whole process stays quick, easy, and almost effortless. If you want to buy high-quality flattening stones and Japanese kitchen knives, then you can check out Kazoku Knives. They have a wide range of great quality and authentic Japanese cutlery.
FAQs
How often should I use a flattening stone?
The number of times you need to use a flattening stone depends on the frequency with which you grit your stone. Coarse stones can be flattened after 1 or 2 sessions, while fine stones need it after 4-6 sessions.
What happens if you don’t soak the whetstone before using a flattening stone on it?
If you don’t soak the whetstone before using a flattening stone on it, then it can permanently affect the surface of the whetstone due to scratches.
Do you soak the flattening stone?
Yes, you need to soak the flattening stone for about 5-10 minutes before the flattening process. However, you must do this after checking if your flattening stone is the type that actually needs soaking.
How can you tell if your whetstone is a splash-and-go style or needs a full soak before flattening?
To check your stone type, pour a few drops of water on the surface. If the water absorbs quickly, it is a soaking stone and needs a full bath. If the water pools or beads on top, it is a splash-and-go style that only requires a quick wet down.
Leave your comment